
TL;DR The lost-wax method for bronze sculpture turns a wax model into a metal casting through moulding, burnout, metal pouring and finishing. This page outlines each stage in sequence, highlights common issues to avoid and suggests what to check before you commission or make a cast.
The lost-wax technique, also called investment casting, transforms a sculpted wax pattern into a durable bronze form. It is widely used for fine art and precision fabrication because it captures fine detail and can produce hollow or solid casts. The account below follows a practical sequence you can use for planning, estimating timescales and preparing models and materials.
Key points to know before you start
Keep these essentials in mind so the process runs reliably.
- Start with a stable, finished wax model: surface quality at this stage determines final bronze detail.
- Decide whether you need solid or hollow casting: hollow casting reduces weight and metal use but adds process steps.
- Choose appropriate investment and gating to match the alloy, scale and complexity of the piece.
- Expect multiple specialist trades: mouldmaking, burnout, bronze pouring, chasing and patination.
Step-by-step process
The sequence below follows the main production path. Each stage has practical checks that help prevent rework and defects.
1. Model and pattern preparation
Create a wax model that reflects final texture, joints and any intended hollows. For hollow castings, a removable core or a shell-building method is required. Check the model for thin edges, undercuts and fragile details that may need internal supports.
2. Spruing and gating
Attach wax gates and a pouring cup so molten metal can flow to every part of the cavity without trapping air. Gating design affects metal flow, solidification and porosity, so position gates to feed heavy sections and avoid isolated hot spots.
3. Investment moulding
Surround the wax assembly with an investment mix to form a rigid mould. The choice of investment and the layering technique affects expansion, strength and final surface finish. Allow adequate setting time and control drying to prevent cracks or steam expansion during burnout.
4. Burnout
Heat the mould to remove wax and to develop the required pattern of expansion. Burnout schedules differ by investment type and mould mass; a controlled programme prevents thermal shock and ensures all wax residues are gone before pouring.
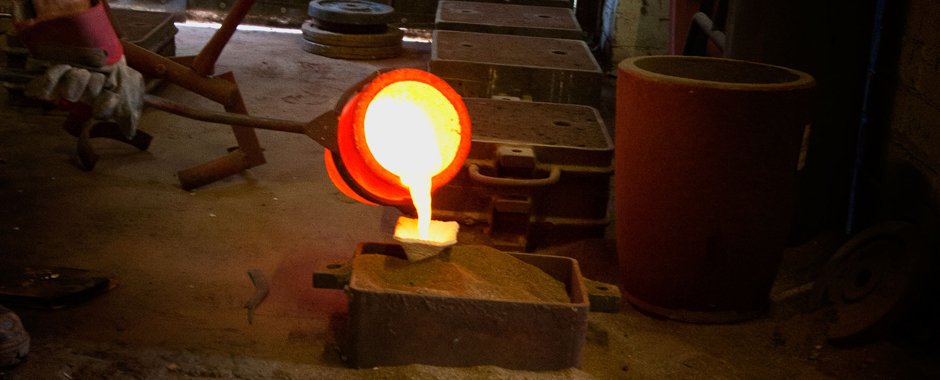
5. Bronze melting and pouring
Melt the chosen bronze alloy to correct pouring temperature and skimming practice. Pour steadily into the preheated mould; inadequate temperature or rushed pouring can cause misruns, cold shuts or excessive oxidation.
6. Knockout and metal cleaning
Once cooled, break the investment to reveal the casting. Remove gates and risers, then begin metal preparation: grinding, chasing, welding repairs and blending surface details. This stage returns control of surface texture to the maker.
7. Patination and finishing
Apply patination and protective coatings as required. Patinas develop differently on cleaned versus uncleaned metal, so test on scrap when using aggressive chemical colours. Finally, consider mounting, fixing or mechanical inserts needed for installation.
Preparing and quality checks
Taking a few practical steps beforehand reduces risk and cost later. Make sure the wax model is finalised and that you have discussed alloy choice, expected patina and dimensional tolerances with your foundry. If you need a high level of detail or a very thin section, flag this early so gating and alloy selection can compensate.
Bronzecraft routinely advises on material selection, gating strategy and finishing options based on project scale and artistic intent. For a full view of techniques and when to choose each method, see: Bronze Casting Techniques: Complete Guide and for a complementary technical overview see: Lost-Wax Bronze Casting: Process And Applications.
FAQ
Timelines vary. A small single-piece cast can progress in a few days if models and moulds are simple. Larger or hollow works need extra time for mould preparation, controlled burnout and careful finishing, so allow several weeks for complex commissions.
Porosity commonly results from trapped gases, poor gating or incorrect pouring temperature. Good gating design, venting and correct alloy handling minimise these defects.
Choose hollow casting for larger works to reduce weight and material cost. Solid casting suits smaller, dense pieces or when mass is structurally important. Discuss scale, installation and finish before deciding.
Finalise surface detail and confirm any hollows, draft angles and hidden fixings. Decide on mounting points and desired patina, and share these with the foundry before moulding begins.
Summary and next steps
The lost-wax route gives excellent detail and flexibility but requires careful preparation at each stage. If you are planning a commission or production run, prepare a final wax model, confirm gating and alloy choices, and discuss burnout schedules with your fabricator. To compare methods and find deeper technical detail, see: Bronze Casting Techniques: Complete Guide.
If you would like specific guidance for a sculptural project, compiling photographs, dimensions and a brief on desired finish will help any foundry or fabrication partner give a practical estimate and process plan.